

Sampath007
-
Posts
80 -
Joined
-
Last visited
Everything posted by Sampath007
-
 i tryed bro its not work then i replayed that time but my replay not here
 -
How to make work un supported Graphics in Mojave
Sampath007 replied to Sampath007's topic in Guides and Tutorials
It's have natively supporting no need use this it's for only hd3000 brost inject intell then platform id 0x0a260006 then go device Intell gfx type 0x04128086 then save use latest lilu and green then this guide 100% works in laptop if it's desktop u need connect only HDMI or display port vga not work -
Apple’s Mojave they dropped few old Amd ,Intel & Nvidia support Mojave Here Am gonna show how to make work un supported Graphics in Mojave ##This guide Also Applicable For Real Macs too Work Step 1 Intel HD 3000 Graphics Link Below HD 3000.zip Step 2 Old Nvidia Cards Link Below Nvdia Cards.zip Step 3 Old Amd Cards Link Below Amd Cards.zip A 1 Download this kexts & Drop via KextsHelper7 Give Password Kext-Helper-b7.zip A2 Run this Repair Permission And Give Password Reboot After Enjoy Repair.command.zip All Done Enjoy Happy Hackintosh --Donations via PayPal-- https://tinyurl.com/r2bvzm7
-
Bro sorry for late Replay i tried this kexts sle and others folder too and i injected id 2 in config.plist its not work then i removed dsdt audio patch then sound gone
-
its working partially then its not stable bro no use for that then u replace bcm chip its best way for u
-
yeah its work u can use my without patched config.plist
-
What Chip u using? If u using extrnal usb blutooth it's not showing there
-
codec_dump.txt this my code dump bro
-
Dell 15R 5520 Conexant HD CX20590 Msi GT783R Alc 892 Acer Nitro 515-31 Alc 255 but it's not stable after few reboot it's mic not working bro
-
awesome work bro i tested 3 lap its work very perfectly
-
Guide - MSI B360 Gaming Arctic (Catalina)
Sampath007 replied to onemanosx's topic in Guides and Tutorials
Good job -
Hide Volumes / Extra Boot Entries With Clover Config
Sampath007 replied to erroruser's topic in Guides and Tutorials
Good job -
Anas99 First u need make boot without usb Boot after Runmezip then sent here there is no clover folder your runmezip output
-
Thanks brother
-
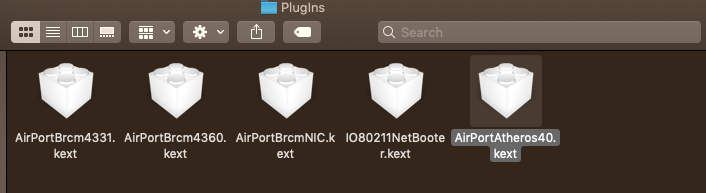
How to Enable Qualcomm Atheros AR5B195&9285 Wifi Cards Un supported in Mojave This guide Applicable For all Atheros Cards Which Working In High Sierra Step 1 Go os Disk Then System/Library/Extension Find This Kexts IO80211Family.kext Copy in Desktop And S/L/E kext Step 2 A,Open Desktop IO80211Family Right Click Show Package Contents/Contents/PlugIns and Copy there this Kexts AirPortAtheros40.kext AirPortAtheros40.kext.zip install Desktop IO80211Family.kext Via KextsHelper7 Link Below Kext-Helper-b7.zip B Its only for 9285 wifi card User Only Wifi and Bluetooth Kexts Link Given Below Drop it EFI/CLOVER/KEXTS /OTHERS Folder Wifi 9285 Only.zip Step 3 Run this And Give Password Reboot After Enjoy Wifi and Bluetooth Repair.command.zip All Done Enjoy Happy Hackintosh --Donations via PayPal-- https://tinyurl.com/r2bvzm7

-
DELL INSPIRON 15R 5520 Laptops (Mojave) (Dual boot Windows 10) -Success System Specs: CPU: Intel :Intel Core i5-3210M (3rd Gen) Its Applicable I3&I7 too GPU: AMD Radeon HD 7670M disabled by DSDT patch or use Olarila High Sierra config02.plist in USB image), Intel HD 4000 RAM: 8Gb DDR3 1600Mhz Ethernet: : Realtek 8105E Wifi: Qualcomm Atheros AR5B195) Replaced(Its Only for 10.13 and below) Mojave 9285 Guide Given Here Audio chipset:Conexant HD CX20590 (Layout ID=03) Card Reader: Realtek (Not Supported) System Drive:Samsung Evo 850 Sata Ssd 250GB (Natively Supported in Mac os) Secondary Drive: SATA Segate 1TB Lets Start Bios Settings: 1. 1St Update Latest Version Bios via Windows. 2. Power on the system. As soon as the first logo screen appears, immediately press F2 to enter the BIOS. 3. Go Sata Set IDE to AHCI. 4. Disabel Secure Boot. 5. Disable Lagcy Boot and Boot Set UEFI Only . 6. Press the F10 key and select Yes to save the changes and exit the BIOS. OS Images Get Here: Creating Mojave USB Installer: (Windows Based Guide) After Download Olarila Mojave .raw Extract Zip Using WinZip After Extract Restore Using Win32 Disk Imager(https://sourceforge.net/projects/win32diskimager/) (Mac OS Based Guide) After Download Olarila Mojave.raw Extract Zip Using WinZip After Extract Restore Using Etcher.app(https://etcher.io/) Post Installation: 1. Press F12 the boot Menu. 2. Choose Olarila Usb 3. At the Clover Screen, choose your new Mojave installation. 4. Complete macOS setup 5.Open Usb Then Go Files Folder Clover BootLoader. Without Patched: After Finished Boot loader Open usb then go Files folder Open EFI Mounter pro Mount HDD EFI Folder Open EFI Delete Clover folder then replace with this clover reboot. With Out patch.zip 2. With All Patched: Special Credit only for Maldon Best Man Always.. Get Here patched.zip Work ???? 1. Sleep, Restart and Shutdown 2. Close Lid and Wake LID (Sleep and Wake via LID) 3. Audio Mic and Audio output 4. Touchpad 5. FN + Brightness Up + Down 6. Fn + Volume Up + Down 7. Dual Boot with Windows 10 8. All USB ports and Super Speed USB 3.0 Work (5GB / s) How to Do Dual-boot (Bios Only UEFI mode) 1. Make EUFI Windows bootable disk using Rufus 2.7 or later(https://rufus.akeo.ie/) 2. Boot into laptop with USB stick 3. When at Choose Disk to install page, Press shift+F10 to enter command mode 4. Type diskpart 5. Type list disk 6. Select disk x (x is primary hd or ssd) 7. Type convert gpt 8. Type create partition efi size=200 if its not created 9. Type format fs=fat32 quick 10. Type create partition primary size=xxxxxx (in MB) 11. Type format fs=ntfs quick 12. Type exit 13. Continue to install till end 60% Clover Automatically fetch Windows Boot Folder ifts Not work We Need Add Manually Using Easy UEFI Guide Given Below Step 1: Run EasyUEFI and See which Boot Entries are available,now we gonna add Missing Entry for OSX Bootloader ( Clover Bootloader ). Disk0 is usually the internal Hard Drive / SSD. In the Boot order section, we can see that only Windows Boot Manager is detected. There is no mention of Clover UEFI anywhere. Step 2: To solve this problem, click on the Add button (the second button you see on the right) Step 3: Now Change Type fromWindows BootManager to Linux or Other OS , Type Name in Description Box (Whatever you want Clover Bootloader or Mac OSX Bootloader or Else depends upon you), and Click Browse Button. Step 4: Now Expand EFI => BOOT or CLOVER Folder , Select any of Bootx64.efi or Cloverx64.efi , Both are Clover Bootloader files Choose one or add Entry for Both but one is Enough to Boot Clover then why you waste your time but if you having Issue with and Then Use Another Option. Step 5: Add Newly Created Option In Bios Boot Menu Choose as Boot Device Save then reboot All Done Enjoy Happy Hackintosh --Donations via PayPal-- https://tinyurl.com/r2bvzm7
-
Awesome
-
Guide - MSI B360 Gaming Arctic (Catalina)
Sampath007 replied to onemanosx's topic in Guides and Tutorials
Nice -
ASUS ROG STRIX Z370-F GAMING-Hackintosh (Its applicable All UHD 630 Intel Processors) Special thanks Maldon and Etc,. System Specs: CPU: Intel Core i7-8700k 3.8Ghz (Coffelake) GPU: Intel UHD 630 NO GPU (Natively Supported HDMI/Display Port Only) RAM: 32GB DDR4 3000Mhz Ethernet: : Intel I219-V Audio chipset: Realtek ALC 1220 (Layout ID=1) Card Reader: Realtek (Not Supported) System Drive:Samsung Evo 970 NVME M.2 250GB (Natively Supported in High Sierra) Secondary Drive: SATA Segate Firs Cuda1TB Lets Start BIOS / UEFI Settings • Advanced/Intel Virtualization Technology - Enabled • Advanced/System Agent (SA) Configuration/VT-d - Disabled • Advanced/System Agent (SA) Configuration/Graphics Configuration/Primary Display - PCIE • Advanced/System Agent (SA) Configuration/Graphics Configuration/iGPU Multi-Monitor - Disabled • Advanced/USB Configuration/Legacy USB Support - Enabled • Boot/CSM (Compatibility Support Module)/ Launch CSM - Disabled • Boot/Secure Boot/ OS Type - Other OS • AI Tweaker - Overclocking, an exercise for the reader OS Images Get Here: https://www.olarila.com/topic/6278-hackintosh-olarila-vanilla-images/ Creating High Sierra USB Installer: (Windows Based Guide) After Download Olarila High Sierra.raw Extract Zip Using WinZip After Extract Restore Using Win32 Disk Imager After Download Olarila High Sierra.raw Extract Zip Using WinZip After Extract Restore Using Etcher.apphttp://'>(https://sourceforge.net/projects/win32diskimager/) (Mac OS Based Guide) After Download Olarila High Sierra.raw Extract Zip Using WinZip After Extract Restore Using Etcher.apphttp://(https://etcher.io/) YouTube Guide: https://www.youtube.com/watch?v=Qxoh0BXVYt0&feature=youtu.be Post Installation: 1. Press F8 the boot Menu. 2. Choose Olarila Usb 3. At the Clover Screen, choose your new High Sierra installation. 4. Complete macOS setup 5.Open Usb Then Go Files Folder Clover BootLoader. How to install Clover bootloader – LEGACY& UEFI "> 1. Without Patched: After Finished Boot loader Open usb then go Files folder Open EFI Mounter pro Mount HDD EFI Folder Open EFI Delete Clover folder then replace with this EFI reboot. EFI.zip Work ???? 1. Sleep, Restart and Shutdown 2. Audio Mic and Audio output 3. F1 + Brightness Up + F2 Down Using Native Brightness App https://olarila.com/files/?dir=Utils 4. Dual Boot with Windows 106. 5. All USB ports and Super Speed USB 3.0 Work (5GB / s) 6. Etc WD Need to do DSDT Patches For Best Performance: A. Run Me Zip then post files here see Link Below https://olarila.com/files/?dir=Utils B.DSDT Patched Request Post Files HERE: https://www.olarila.com/topic/923-dsdt-patch-requests/ How to Do Dual-boot (Bios Only UEFI mode) 1. Make EUFI Windows bootable disk using Rufus 2.7 or later(https://rufus.akeo.ie/) 2. Boot into laptop with USB stick 3. When at Choose Disk to install page, Press shift+F10 to enter command mode 4. Type diskpart 5. Type list disk 6. Select disk x (x is primary hd or ssd) 7. Type convert gpt 8. Type create partition efi size=200 9. Type format fs=fat32 quick 10. Type create partition primary size=xxxxxx (in MB) 11. Type format fs=ntfs quick 12. Type exit 13. Continue to install till end 60% Clover Automatically fetch Windows Boot Folder ifts Not work We Need Add Manually Using Easy UEFI Guide Given Below Step 1: Run EasyUEFI and See which Boot Entries are available,now we gonna add Missing Entry for OSX Bootloader ( Clover Bootloader ). Disk0 is usually the internal Hard Drive / SSD. In the Boot order section, we can see that only Windows Boot Manager is detected. There is no mention of Clover UEFI anywhere. Step 2: To solve this problem, click on the Add button (the second button you see on the right) Step 3: Now Change Type fromWindows BootManager to Linux or Other OS , Type Name in Description Box (Whatever you want Clover Bootloader or Mac OSX Bootloader or Else depends upon you), and Click Browse Button. Step 4: Now Expand EFI => BOOT or CLOVER Folder , Select any of Bootx64.efi or Cloverx64.efi , Both are Clover Bootloader files Choose one or add Entry for Both but one is Enough to Boot Clover then why you waste your time but if you having Issue with and Then Use Another Option. Step 5: Add Newly Created Option In Bios Boot Menu Choose as Boot Device Save then reboot All Done Enjoy Happy Hackintosh Sharing is Caring Donate Olarila Maldon https://tinyurl.com/r7fchn9
-
U need block lilukexts apple lac + whatever grrn kexts Added in 1 minute 42 seconds: https://www.facebook.com/profile.php?id=100003474789556 contact here bro
-
mr.vini-guerrero i surly help u its 95% same hardware
-
Bro it's not for all still few laps have problem that why I suggested this method ?
-
Guide Gigabyte Z68A-D3H-B3 (High Sierra 10.13.6)
Sampath007 replied to onemanosx's topic in Guides and Tutorials
Perfect -
Acer Nitro AN 515-31) Its Support All 8Th Gen Laptops (High Sierra) (Dual boot Windows 10) – Success System Specs: CPU: Intel Core i7-8550u 1.8Ghz (Coffelake) GPU: Nvdia GeForce MX150 (Optimus disabled by DSDT patch or use Olarila High Sierra config02.plist in USB image), Intel UHD 620 RAM: 12Gb DDR4 2133Mhz Ethernet: : Realtek 8411B Wifi: Qualcomm Atheros QCA4xxx (replaced with Mac OS supported BCM94352Z m.2 NGFF type) Audio chipset: Realtek ALC255 (Layout ID=31) Card Reader: Realtek (Not Supported) System Drive:Samsung Evo 970 NVME M.2 250GB (Natively Supported in Mac os) Secondary Drive: SATA Segate 1TB Lets Start Bios Settings: 1. 1St Update Latest Version Bios via Windows. 2. Power on the system. As soon as the first logo screen appears, immediately press F2 to enter the BIOS. 3. Use the right arrow key to select Security. 4. Use the down arrow key to highlight Set Supervisor Password and press Enter. 5. Create a password and press Enter. Retype the password to confirm and press Enter again. 6. Use the right arrow key to select Boot Set UEFI. 7. Press the down arrow key to select Secure Boot and press Enter. 8. With the arrow key, highlight Disabled and press Enter. 9. Go Main then Touchpad Set Advanced For with i2c 10. Press the F10 key and select Yes to save the changes and exit the BIOS. OS Images Get Here: Creating High Sierra USB Installer: (Windows Based Guide) After Download Olarila High Sierra.raw Extract Zip Using WinZip After Extract Restore Using Win32 Disk Imager(https://sourceforge.net/projects/win32diskimager/) (Mac OS Based Guide) After Download Olarila High Sierra.raw Extract Zip Using WinZip After Extract Restore Using Etcher.app(https://etcher.io/) Post Installation: 1. Press F12 the boot Menu 2. Choose Olarila Usb 3. At the Clover Screen, choose your new High Sierra installation. 4. Complete macOS setup 5.Open Usb Then Go Files Folder Clover BootLoader. How to install Clover bootloader – LEGACY& UEFI 1. Without Patched: After Finished Boot loader Open usb then go Files folder Open EFI Mounter pro Mount HDD EFI Folder Open EFI Delete Clover folder then replace with this clover reboot. (https://drive.google.com/file/d/1swVEA1NTBMdUFZM9Jnq2OuCXor-8nOpr/view) 2. With All Patched: Special Credit only for MaLd0n Best Man Always.. Get Here CLOVER.zip Work ???? 1. Sleep, Restart and Shutdown 2. Close Lid and Wake LID (Sleep and Wake via LID) 3. Audio Mic and Audio output 4. Touchpad 5. FN + Brightness Up + Down 6. Fn + Volume Up + Down 7. Dual Boot with Windows 10 8. All USB ports and Super Speed USB 3.0 Work (5GB / s) 9. Card Reader b]Not work ?? [/b] - Etc How to Do Dual-boot (Bios Only UEFI mode) 1. Make EUFI Windows bootable disk using Rufus 2.7 or later(https://rufus.akeo.ie/) 2. Boot into laptop with USB stick 3. When at Choose Disk to install page, Press shift+F10 to enter command mode 4. Type diskpart 5. Type list disk 6. Select disk x (x is primary hd or ssd) 7. Type convert gpt 8. Type create partition efi size=200 if its not created 9. Type format fs=fat32 quick 10. Type create partition primary size=xxxxxx (in MB) 11. Type format fs=ntfs quick 12. Type exit 13. Continue to install till end 60% Clover Automatically fetch Windows Boot Folder ifts Not work We Need Add Manually Using Easy UEFI Guide Given Below Step 1: Run EasyUEFI and See which Boot Entries are available,now we gonna add Missing Entry for OSX Bootloader ( Clover Bootloader ). Disk0 is usually the internal Hard Drive / SSD. In the Boot order section, we can see that only Windows Boot Manager is detected. There is no mention of Clover UEFI anywhere. Step 2: To solve this problem, click on the Add button (the second button you see on the right) Step 3: Now Change Type fromWindows BootManager to Linux or Other OS , Type Name in Description Box (Whatever you want Clover Bootloader or Mac OSX Bootloader or Else depends upon you), and Click Browse Button. Step 4: Now Expand EFI => BOOT or CLOVER Folder , Select any of Bootx64.efi or Cloverx64.efi , Both are Clover Bootloader files Choose one or add Entry for Both but one is Enough to Boot Clover then why you waste your time but if you having Issue with and Then Use Another Option. Step 5: Add Newly Created Option In Bios Boot Menu Choose as Boot Device Save then reboot All Done Enjoy Happy Hackintosh Sharing is Caring Donate MaLd0n https://tinyurl.com/r2bvzm7
-
Thanks so much your efforts Bro ??